How to make marshmallow pops

Chocolate covered marshmallows as party favors and party decorations
Today I am sharing a tutorial on how to make marshmallow pops. If you have read my article about Polka dot baby shower, you may already know that a friend and I threw a baby shower for a good friend of ours. The baby shower turned out to be a success, and our handmade and not so handmade decorations looked great. Since we were planning a baby shower for a big group of people and on a budget, we were looking for baby shower favors that could also be used as table decorations. The favors needed to fit into our "polka dot" theme and be very inexpensive - we needed at least 50, to be on the safe side. We decided that chocolate covered marshmallows with sprinkles would fit the bill. 50 chocolate covered marshmallow pops ended up costing us around $20 (the cost includes marshmallows, sticks, chocolate morsels, sprinkles, and clear bags with ties) - that's only $0.40 per favor! Plus, the favors were used as decorations, so we allocated some of the cost to our decorating budget.
Image Source: ©Copyright 2013 KatieColette. All rights reserved.
Disclosure: Please know that if you make a purchase using a link on this page, I may earn a commission and I am very grateful for your support of this page. Thank you! the fine print
If you are planning a party and are looking for party favor ideas, I would highly recommend chocolate covered marshmallow or cake pops - they are easy to make and are very affordable, and that's very important when you are on a budget and are expecting a big group of people.
Ingredients and supplies
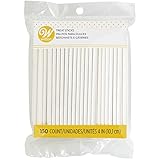
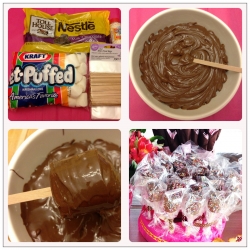
Before making fifty party favors, I decided to make a small trial batch of marshmallow pops, so I picked up chocolate morsels, marshmallows, and sprinkles at a local grocery store. I also got wooden coffee stirring sticks, since they were only $2, and I didn't have time to go out and look for lollipop sticks that day. We later ordered treat bags, like the ones featured below, and they were perfectly sized for the marshmallow pops.
If I were to do it again, I would get the marshmallows locally (unless I'd be looking for a certain flavor not carried by our grocery chains), and then get the rest of the supplies on Amazon. First of all, the lollipop sticks would have worked a lot better than the wooden coffee stirring sticks because of the cylinder shape and the paper texture that would have prevented the marshmallows from slipping off easily. Second, I hear that Wilton cocoa melts work better for cake and marshmallow pops (when compared to chocolate morsels) - they take longer to melt (with less room for error), and the chocolate solidifies quicker when on the pop. I also love the selection of sprinkles on Amazon - so many options to choose from!


How to make marshmallow pops
Tutorial
Once you have all the ingredients and supplies, it's really easy to make and decorate marshmallow pops. But before you begin, you need to have a very good idea of where you are going to dry and store the pops, after you cover them in chocolate. You can either use Styrofoam, green foam blocks used in floral arrangements, or a lollipop holder, or you can simply line a cookie sheet with parchment paper and stand the pops with the marshmallow top down.
To make 20-25 marshmallow pops, you will need a bag of large marshmallows (there are usually around 35 marshmallows in a bag) and a 12 ounce bag of Nestle morsels or a 10 ounce bag of Wilton melts.
How to make marshmallow pops:
1. Empty half a bag of chocolate morsels and into a ceramic or a glass dish and microwave it on "high", stirring every 15 seconds. The instructions for melting Wilton candy melts can be found here: melting candy. Helpful tip: to prevent chocolate from drying out, add a little vegetable oil to chocolate morsels or candy melts before melting it in the microwave. It may be a real lifesaver if you are preparing party favors a day or two before the event.
2. Once the chocolate is melted, stick a marshmallow on a lollipop stick and dip it in chocolate, until the marshmallow is evenly covered. You may want to roll the marshmallow sideways (vs. dipping it) to prevent the marshmallow from slipping off the stick and/ or use another stick or a butter knife to help you cover the marshmallow more evenly.
Please note: If you want the marshmallow to be covered on all sides, including the bottom, you will first need to dip the stick about 1/2" in chocolate and then stick a marshmallow on top of it. Repeat the procedure with all marshmallows and let the chocolate dry for about 10 minutes. It may be a good idea to melt just enough chocolate to cover just the sticks, so it doesn't dry up while you are waiting for chocolate on the stick to harden. Once the time is up, dip marshmallows in chocolate, one at a time.
3. Decorate chocolate covered marshmallow with sprinkles, holding the marshmallow over a bowl, to catch any sprinkles that don't stick to the chocolate.
4. Set the decorated chocolate covered marshmallow aside to dry and repeat steps 2 and 3 with the next marshmallow.
5. If you want to speed up the drying process, place chocolate covered marshmallows in the refrigerator for about 30 minutes.
6. Once the chocolate is completely dry, wrap the marshmallow pops in lollipop bags and tie them with a pretty ribbon or twist ties. Sometimes twist ties come included in the package, or you can buy them separately.
How to make marshmallow pops - Video tutorials
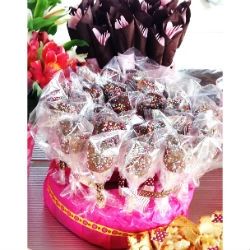
Chocolate covered marshmallow pops on a display

Image Source: ©Copyright 2013 KatieColette. All rights reserved.
How to display cake pops for a baby shower
Creative ideas for how to display cake pops for a baby shower:
- Display cake pops on a platter
with cake pop/ chocolate covered marshmallow resting on the platter - Display cake pops in a bucket filled with beans
maybe could use pebbles or marbles instead? - Stick cake pops in a cake
Love the idea of displaying pops on a cake


